TAMS Wiki:Intro to Wiki
Welcome to the TAMS Wiki page! Eager to start contributing but you aren't sure how to? You've come to the right place! The following page will cover the common features and tricks used on this Wiki. For full coverage, please visit the MediaWiki help page.
An account is no longer required to make any edits, but you can create an account here. If you make any edits without an account, they'll show up under your IP address. In the future, email verification will be enabled.
Pages[edit source]
Pages are what hold the content for the Wiki! Pretty straight forward.
Creating a page[edit source]
There are two methods for creating a page:
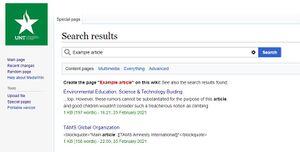
- If you search for a page that doesn't exist (using the search box and "Go" button on the left of the page) then you will be provided with a link to create the new page.
- Type "http://tamswiki.org/wiki/ARTICLE" into your address bar, but replace ARTICLE with your desired page name.
Editing a page[edit source]
You can edit a page using the Visual Editor (default) or source. Simply, click on "Edit" or "Edit source" to edit a page. When saving changes, add a simple description of what you added.
Changing the name of a page[edit source]
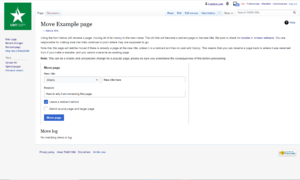
To change the name of a page, you must move the page to its new name location. To do so, click "Move" under "More" in the top right corner, which will take you to a renaming page. Then, type the page's new name under "New title", and give your reason for renaming the page under "Reason". Keep "Leave a redirect behind" selected. Unless you really need to, you can usually leave the dropdown box as "Main".
Note: you need an account to do this.
Categories[edit source]
Categories are used to group together relevant pages, such as the categories for classes. (See Category:Class of 2022) Please avoid making categories for specific pages (has less than 10-20 pages).
Creating a category[edit source]
Creating a category can be similar to creating a page, but there is an easier method.
- While editing a page in Visual Editor (default editor), click the three dash lines. Then click Categories. Type in the name of the category you wish to create. Press Enter and click Apply changes.
- Search for "Category:CATEGORY", but replace CATEGORY with your desired category name. If the category does not exist, the search result will give you an option to create the category.
- Type "https://tamswiki.org/wiki/Category:CATEGORY" into your address bar, but replace CATEGORY with your desired category name.
Adding a page to a category[edit source]
While editing a page in Visual Editor (default editor), click the three dash lines. Then click Categories. Type in the name of the category you wish to add your page to. Press Enter and click Apply changes.
Infoboxes[edit source]
Creating an infobox[edit source]
There should be very few reasons to create a new infobox template. However, if one is necessary, either message Jeongwoo or look at existing infoboxes to learn how they are created.
Adding an infobox to a page[edit source]
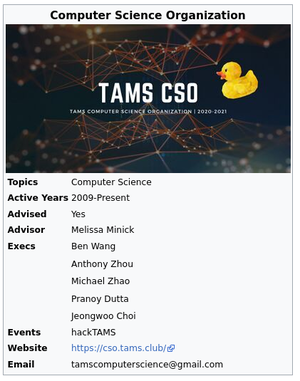
Infoboxes can be added to a page through Template under the Insert menu. Search "Infobox TYPE" and click Add template. Once added, add the necessary/relevant information.
Current available infoboxes include:
- Building
- Club
- Event
- Faculty
- Room
- Staff
- Student
To learn about how to use an infobox or template, visit http://tamswiki.org/wiki/Template:TEMPLATE/doc. (For example, http://tamswiki.org/wiki/Template:Incomplete/doc)
Adding an image to an infobox[edit source]
To add an image to an infobox, you must upload the image on the Upload File page. Once uploaded, copy the name of the file and paste it into the image field. Your image should now appear.


